Is core strength and shoulder flexibility letting you down in your forearm balance attempts? Don’t let these debilitating factors keep you from reaping the benefits of pincha mayurasana – forearm stand. Ahead of his online workshop on 5 December, Anastasis Tzanis shares drills which can help you develop upper-body strength, shoulder and hip flexibility to help make this inversion a bit easier.
In this article I will breakdown the biomechanics of pincha mayurasana (forearm stand) and provide you with a series of exercises to help you achieve a 30-second forearm stand hold, if you put in the work. At the end of the article, you can find a few videos with some progressions with the intention to serve as a source for your own creativity.
Prior to starting your forearm balance training, it will be useful to have a solid headstand practice and be able to hold dolphin pose comfortably for two minutes in good form.
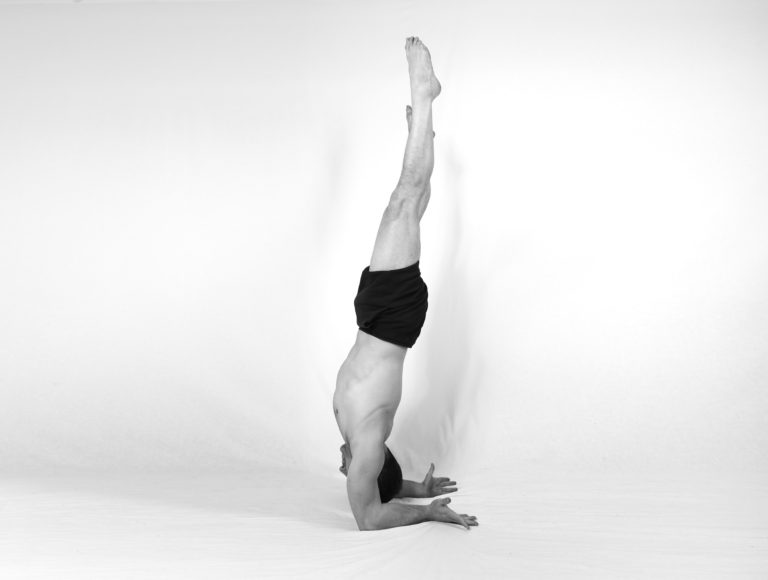
Forearm stand is an inversion during which the forearms are on the floor and the rest of the body is inverted. The position of the forearms on the floor provides a unique challenge for the shoulder joint which is why a lot of practitioners when they are starting out they find forearm standing very “heavy” on the shoulders.
Breakdowning the biomechanics of pincha
When someone is balancing on her forearms, her shoulder is the first joint that is not in contact with the floor (as opposed to wrists and elbows that are). For that reason stability in the shoulder joint is of big importance when it comes to balancing on one’s forearms. We can almost argue that it’s the shoulder position that determines pincha and every other muscle in the lower body could almost be dormant.
Shoulder stability is dependent on the strength and flexibility in the deltoids, lats, pectoralis minor and rotator cuff muscles. The shoulder joint in pincha mayurasana are in flexion (elevated) and medial rotation (external rotation) [video]. To help us achieve the pose then we need to have the appropriate level of stability in the shoulder joint at this specific position. Shoulder joint flexibility is key in forearm balance. The closer someone can bring her shoulders to a 180° degree flexion while maintaining external rotation the easier it will be to find balance.
The shoulder joint naturally externally rotates in flexion, however in pincha mayurasana we need additional external rotation than what most shoulders natural have in flexion.
Why 180° degree shoulder flexion is important?
While a lot of people balance on their forearms without bringing their shoulders in 180° degree flexion, the closer one gets to 180° the less “work” she needs to do with the rest of the body.
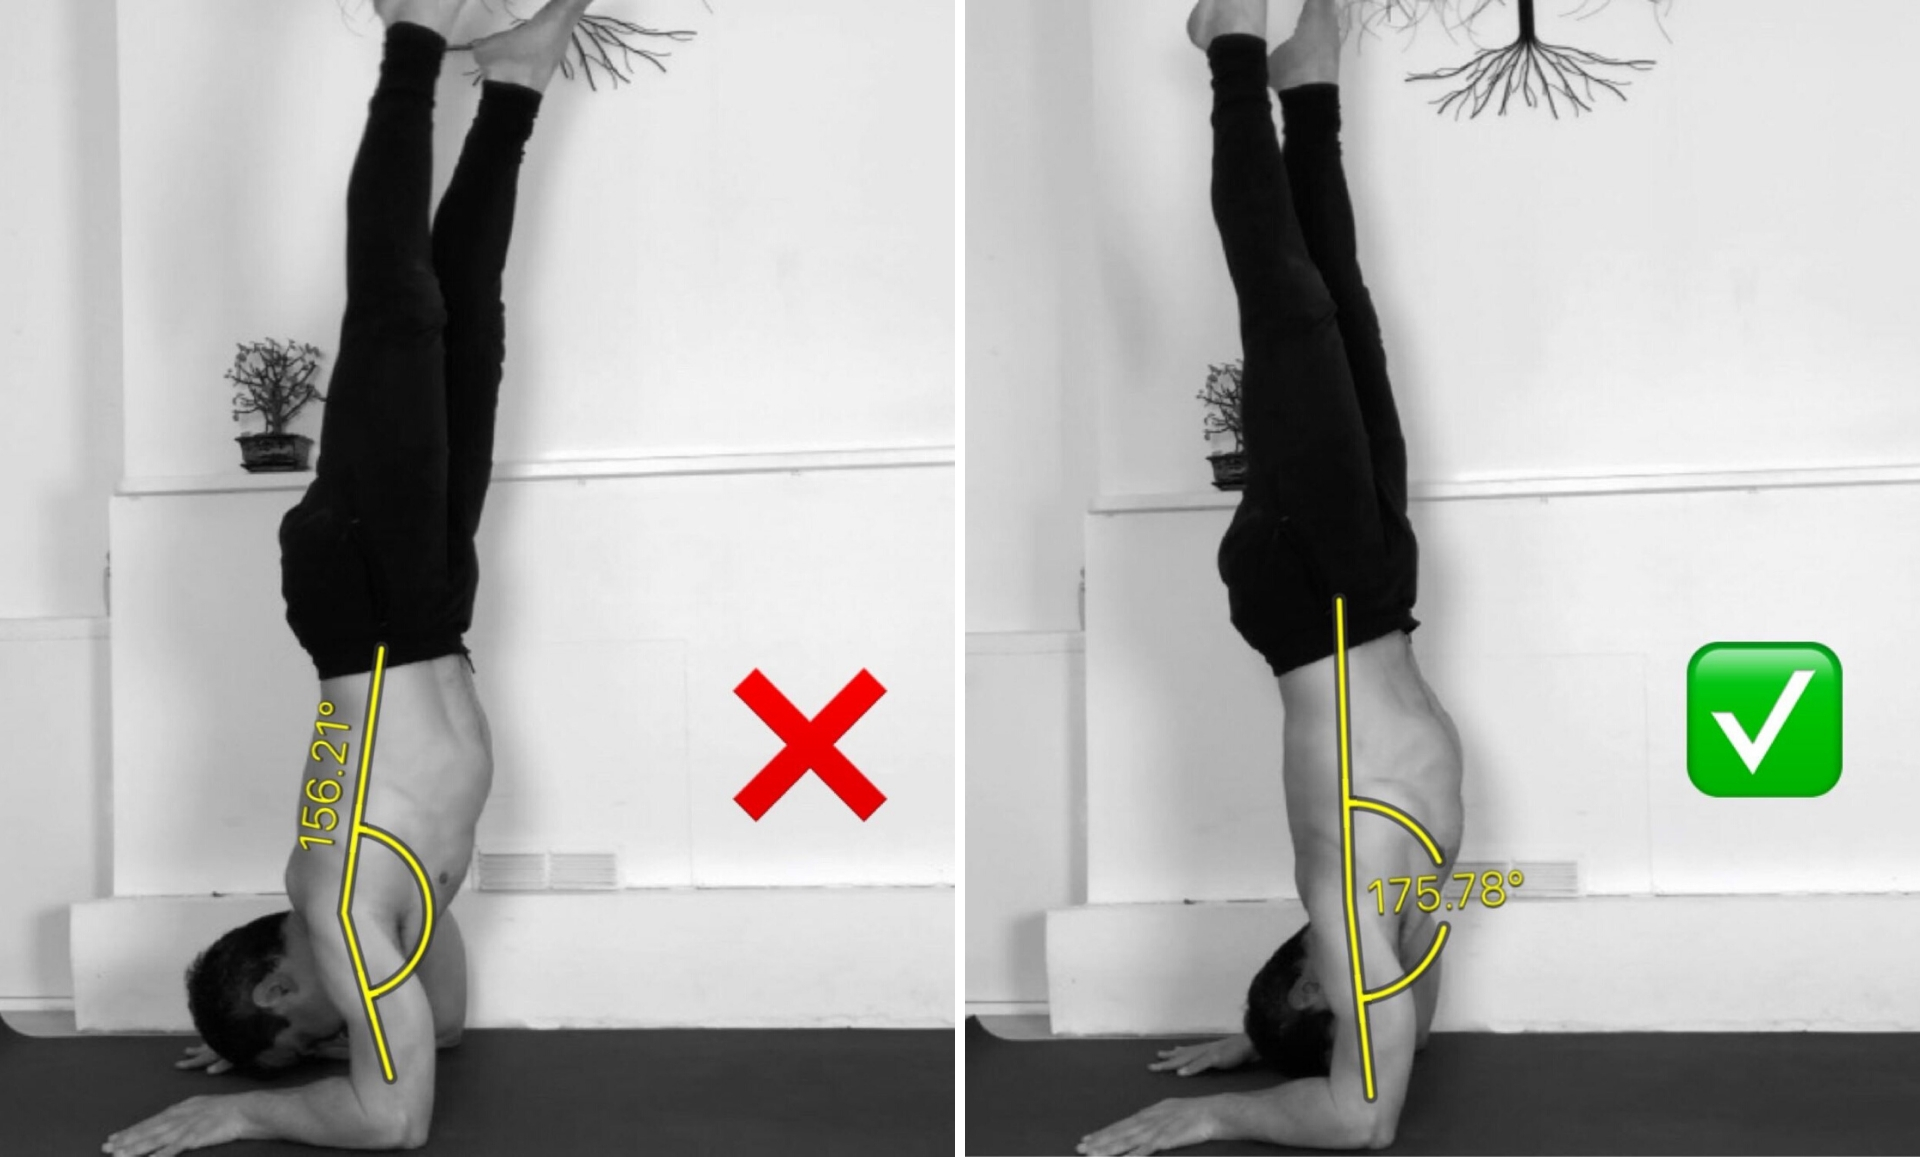
Closed shoulders (< 180° degree flexion) means the trunk (upper body) is moving towards a planche. This will have the following consequences:
– Increase the load in the shoulders in the same way that a planche requires more shoulder strength than a handstand.
– Shift the centre of mass away from the practitioner’s base (which is the forearms). If the lower back, pelvis, hip flexors and knees stay in neutral position this will increase the work in the abdominal muscles, or what happens in most cases get the body in some form of arch shape.
How to improve your shoulder joints’ stability
The stability in the shoulder joint is affected by the deltoids, pectorals, serratus, lats, trapezius, triceps and the rotator cuffs. While it may seem an overwhelming task to stretch and activate (longterm strengthen) all the above muscles every time you train forearm stand, most likely your body is tight/weak only in a couple of them and focusing on these muscles should be your priority. A few things worth remembering are:
– Focus on your end goal and not solely on conditioning. The goal is ultimately to make your shoulder joint stable in the forearm line. Would it be easier if you had an additional 30% strength in your deltoids? Yes. But if you currently cannot balance I can almost guarantee you that there are people weaker than you that they can. Conditioning is important but not everything.
– There are plenty of ways to improve flexibility. When stretching you can use myofascial release, passive stretches or active stretches. If there are limitations due to nerve trapping, nerve flossing will also be needed. Work with a teacher will help you: a) identify any limitations and b) provide you with the most appropriate exercises.
It is likely that some of the exercises below are going to help you improve your shoulder stability but unfortunately, they have not been written with you in mind. If for instance, you have very tight upper traps, the pain you may experience when forearm balancing might be distracting you from everything else. Addressing any major limitations should be of priority.
The importance of core strength
The core gets a lot of attention when it comes to inversions. In my opinion, core involves both the back and abdominal areas. If you agree with this definition of core then you will agree that when addressing shoulder joint stability (discussed above) we are improving our core (through the muscles of the upper back).
How important is strength in the lower back muscles and abdominals through? Abdominal strength is quite important for forearm-balance but often far less than people think.
The quickest way to answer this question is to review briefly the anatomy of the mid-section. The most common grouping of the muscles in the midsection are in inner and outer unit, something pilates practitioners are very familiar with.
The muscles of the outer unit are used primarily to facilitate movement and when they are not used they stay in a more dormant state.
The muscles of the inner unit are responsible for maintaining the integrity of the spine and while they are more active during exercise, they are always “switched on”. The inner unit muscles consist of the diaphragm, multifidus, transversus abdominis and pelvic floor.
The amount of strength in the lower back muscles and abdominals will very much depend on the line we hold. A straddle leg pincha mayurasana position will involve significantly less abdominal strength than a straight line one. As there is little movement involved in holding a position, it is primarily the inner unit muscles that we use the most when balancing. A few things worth considering when assessing your abdominal strength for forearm stand:
– Your spine anatomy can work in your favour or against you. The lumbar (lower) part of the spine has a natural curve called lordosis. Individuals with a flatter lumbar area will have an easier time balancing due to the less degrees they naturally have in their lower back. The reverse also holds true.
– The lower body (while not directly involved in pincha) will also affect the demand for core strength. For most people hips and legs weigh much more than their chest, head and arms. The heavier one’s legs and hips are, the stronger one’s abdominals need to be when forearm balancing.
Exercises for pincha mayurasana
How to come up
Kicking up against the wall initially can accelerate the learning process significantly. Having said that, similar to every other prop (ie. blocks, straps) the use of the wall can be abused leading to dependence on it. Once you have achieved 8-10 successful attempts for 3-5 sets consistently in each of the following drills it’s time to move on and practise the drill with a spotter.
Calibrate your forearm balance kick (against the wall)
Set your forearms parallel with each other and kick up until either your big toe or the ball of your foot gently touches the wall. Then hold for 2 seconds (without moving your second leg) and come down in the slowest possible manner.
While you can alternate the leg with which you kick after every set, it is most likely that you will first get comfortable kicking up with your “good leg”.
I would encourage you to refrain from trying any other drills until you hit 7+ successful attempts out of ten for three sets in this exercise.
A common problem is for practitioners not to reach the wall. The reasons can be:
– Lack of stability in the shoulder joint
– Reduced flexibility in the hip flexors of the top leg
– Lifting the bottom leg too soon off the floor
– Under-firing glutes
Be patient as this drill may take a while until it feels comfortable.
How to hold the position
Forearm balance switches (against the wall)
The starting point of this drill is one foot touching the wall, the other away from the wall with the legs in a small straddle.
This drill has three progressions:
– Easy version: Both feet touch the wall – the leg that was initially touching the wall moves away from the wall – legs continue to switch position.
– Intermediate version: The switch takes place in the air.
– Advanced version: The switch takes place in the air. Every time the feet meet, there is a 2-second hold. With time, the holds can increase in duration.
How to overcome the fear of falling
There is a reason that this section is last. Not because it’s not important but because by the time a lot of the topics covered above have been addressed, from my experience, practitioners have overcome the fear of falling. To make this point more clear: if you are afraid of falling you should refrain from practising in the middle of the room on your own. Also, keep in mind the fear of falling is normal and may stay with you for longer than you wish, but that’s part of the inversions’ training. Today, years after balancing on my forearms for the first time, I still have some fear of falling. This doesn’t put me off from training. You may recall that when you started practising headstands you had fear which currently is reduced or completely gone.
What are the progressions after the standard pincha?
A lot of the times it is not until someone has started working on the progressions of a pose that she solidifies her practice in the standard version. For that reason, I encourage you to practise the following exercises once you have a 30-second consistent forearm stand hold.
Tuck – Straddle – Straight line forearm stand
Five entries into uneven forearm stand
Forearm transitions with palms up
Conclusion
If you have been practising yoga for a while you probably have noticed that a lot of poses (asanas) are progressions or regressions of others. The same thing applies to a lot of breathing exercises as well. Forearm stand (pincha mayurasana) belongs to a group of asanas called inversions. Inversions are defined by the position of the hips been higher, in relation to the head. An inversion most yoga students are familiar with is downward facing dog. Most time we are incapable of achieving a pose because we have not yet “mastered” its regressions. What makes inversions very interesting is that in the process of achieving new poses we come to understand and develop our own body. It is a big interest of mine to understand the idiosyncratic requirements each of my students has. So if you find that some of the principles described in this article or the videos attached don’t apply to you, get in touch.
The above-discussed components of pincha mayurasana are further broken down during Anastasis’s 5 December workshop taking place online through triyoga. Click here for more information and to book.
